

Layered Lighting: A Room-by-Room Guide for Every Home
Layered lighting combines three distinct light sources — ambient (general illumination), task (focused work light), and accent (decorative or focal-point light) — into one coordinated plan. To improve any room today: (1) add a floor lamp or table lamp to supplement your overhead fixture, (2) swap standard bulbs for warm 2700K–3000K LEDs throughout, and (3) plug each lamp into a smart plug or inline dimmer so you control them independently. Renters can do all three without touching a single wire.
- Start with what you have. Identify your existing overhead fixture as your ambient base.
- Add one plug-in lamp at seating or work height for task or accent use.
- Put at least one source on a dimmer or smart plug so you can shift the room’s mood without rewiring.
Key Takeaways
Layered lighting requires at least three independent sources — ambient, task, and accent — each on its own control, with bulbs matched by lumens and Kelvin rather than watts.
| Point | Details |
|---|---|
| Build ambient first | Target ~20 lumens per sq ft for general fill; distribute across multiple fixtures, not one overhead. |
| Put layers on independent controls | Separate dimmers or smart plugs let you shift from task mode to relaxed mode without changing fixtures. |
| Choose bulbs by lumens and Kelvin | Use 2700K–3000K for living spaces; buy dimmable LEDs rated by lumen output, not watts. |
| Accent at 3× ambient brightness | Accent lights need to be roughly three times brighter than ambient to create visible depth and focal points. |
| Noble Abode for renter-friendly pieces | Rechargeable lamps, sculptural accents, and decorative vases from Noble Abode pair directly with any layered lighting plan. |
Table of Contents
- What layered lighting does for a room’s feel and function
- The three core lighting layers and which fixtures work best
- Practical room-by-room plans you can copy
- Step-by-step planning checklist for any room
- How to choose the right bulbs: lumens, Kelvin, CRI, and beam angle
- Controls and installation: dimmers, smart options, and zoning
- Common mistakes and how to fix them
- Thinking like a designer when you layer lighting
- Noble Abode decor that pairs with your lighting plan
- Sources
- FAQ
What layered lighting does for a room’s feel and function
A single overhead fixture floods a room with flat, shadowless light. Lighting frequently has more impact on how a space feels than finishes do — and an over-reliance on one ceiling source is often the reason a room feels cold or uninviting, no matter how good the paint color is.
Layering solves that by assigning each light source a specific job.
- Ambient light fills the room with general illumination. Think recessed cans, flush-mount ceiling fixtures, or a central pendant. It sets the baseline brightness.
- Task light targets a specific activity zone: a reading chair, a kitchen counter, a desk. It needs to be brighter than ambient without causing glare.
- Accent light draws the eye to a focal point — a piece of art, a bookshelf, an architectural detail. It creates depth and visual interest.
The practical benefits stack up quickly: mood control (dim ambient, keep task bright for reading), flexibility (one room serves multiple activities), better function (no eye strain at the counter), and lower energy use (you run only what you need). A layered plan also lets you shift a room from bright task mode to warm relaxation mode without changing a single fixture, just by adjusting independent controls.
The three core lighting layers and which fixtures work best
Ambient layer
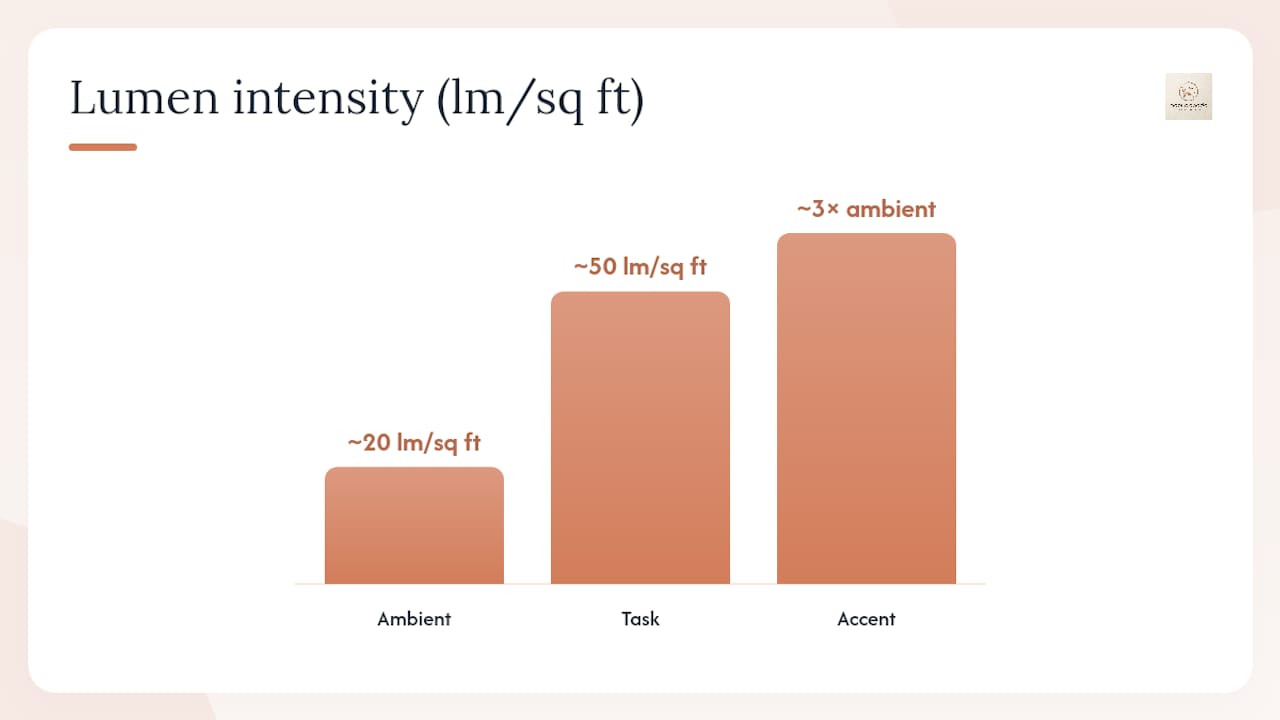
The ambient layer is the room’s foundation. Its job is even, comfortable general illumination with no harsh shadows. Common fixtures: recessed downlights, flush-mount or semi-flush ceiling fixtures, chandeliers, and large pendant lights. For planning, aim for about 20 lumens per square foot for ambient lighting. A 200 sq ft living room needs roughly 4,000 lumens of ambient output spread across multiple sources.
Task layer
Task lighting targets a specific activity. Reading lamps, under-cabinet strips, pendant lights over an island, and adjustable desk lamps all belong here. The target is around 50 lumens per square foot in the task zone — noticeably brighter than ambient, but aimed downward or inward so it does not spill into the rest of the room.
Accent layer
Accent lights highlight objects or surfaces: picture lights, directional track heads, LED strip lights behind shelving, or uplights behind a plant. Accent lighting should be roughly three times brighter than ambient to create clear depth and contrast. Pick two or three focal points per room — if everything is highlighted, nothing stands out.
Additional layers worth knowing
Beyond the core three, designers sometimes add a perimeter layer (wall sconces or cove lighting that washes walls for perceived spaciousness), a decorative layer (a sculptural lamp or chandelier that reads as art), and backlight (LED strips behind a TV or under a floating shelf for soft fill).
Pro Tip: Keep color temperature consistent across all layers in one room. Mixing a 2700K floor lamp with a 4000K recessed can creates a jarring visual clash. Pick one Kelvin value and buy all bulbs to match.
| Layer | Primary Job | Common Fixtures | Lumen Target |
|---|---|---|---|
| Ambient | General fill light | Recessed cans, flush-mount, chandelier | ~20 lumens/sq ft |
| Task | Activity-specific focus | Desk lamp, under-cabinet strip, pendant | ~50 lumens/sq ft |
| Accent | Focal-point emphasis | Track head, picture light, LED strip | ~3× ambient level |
| Perimeter | Wall wash, spaciousness | Sconce, cove light | Varies by wall area |
| Decorative | Visual interest | Sculptural lamp, statement pendant | No lumen target |
Practical room-by-room plans you can copy
Every room benefits from at least 2–3 independent light sources; larger living rooms often use 10 or more. The plans below give you a starting configuration, lumen guidance, and a renter-friendly swap for each space.
Living room
- Ambient: Recessed downlights or a central pendant (target 3,000–4,000 lumens total for a 150–200 sq ft room)
- Task: A floor lamp beside the reading chair or sofa end (800–1,100 lumens)
- Accent: Directional track head or picture light aimed at art; LED strip behind shelving
- TV rooms: Avoid bright overhead fixtures that reflect on screens. Use soft side lamps and a subtle LED backlight strip behind the TV. Test from the seating position at night before finalizing placement.
- Renter swap: Plug-in floor lamp + plug-in LED strip on a smart plug; no hardwiring needed
- Mounting note: Floor lamp shade bottom at 60–65 inches; table lamp shade bottom at 58–64 inches when seated
Kitchen
- Ambient: Recessed cans or a flush-mount fixture (aim for 5,000–8,000 lumens in a 150 sq ft kitchen)
- Task: Under-cabinet LED strips directly above the counter surface; pendant lights 30–36 inches above an island
- Accent: Open-shelf lighting with LED puck lights or strips
- Color temperature: 3000K for ambient warmth; 4000K acceptable under cabinets where food prep demands color accuracy
- Renter swap: Plug-in under-cabinet LED bars with adhesive mounting; no electrician needed
Bedroom
- Ambient: Flush-mount or semi-flush ceiling fixture (2,000–3,000 lumens for a 120–150 sq ft room)
- Task: Bedside table lamps or wall-mounted reading lights (400–800 lumens each)
- Accent: LED strip behind a headboard or inside a wardrobe; uplights behind a large plant
- Color temperature: 2700K throughout for sleep-supportive warmth
- Renter swap: Rechargeable table lamps on each nightstand; plug-in sconces with cord covers
Bathroom
- Ambient: Recessed ceiling fixture or flush-mount (1,500–2,500 lumens)
- Task: Vanity bar or side-mounted sconces flanking the mirror at eye level (approximately 60 inches from the floor to the center of the fixture). Overhead vanity bars cast unflattering shadows; side mounting is the professional standard.
- Accent: LED strip under a floating vanity or inside a niche
- Color temperature: 3000K for a warm but accurate color rendering; CRI 90+ near the mirror
- Renter swap: Plug-in vanity sconces with cord covers; battery-powered LED strip under the vanity
Dining room
- Ambient: A dimmer-controlled chandelier or pendant (2,000–3,000 lumens)
- Task: The pendant itself doubles as task light over the table; hang it 30–36 inches above the tabletop
- Accent: Wall sconces or a buffet lamp on a sideboard
- Renter swap: Plug-in pendant with a swag hook kit; no ceiling box required
Entry / foyer
- Ambient: Flush-mount or semi-flush fixture (800–1,500 lumens)
- Task: Not always needed; a small table lamp on a console works for mail sorting
- Accent: Uplight behind a plant or a picture light on a mirror
- Renter swap: Plug-in table lamp on a console; battery-powered picture light
Home office
- Ambient: Recessed or flush-mount ceiling fixture (2,000–3,000 lumens)
- Task: An adjustable desk lamp aimed at the work surface (400–800 lumens, positioned to the non-dominant side to avoid hand shadows)
- Accent: Shelf lighting or a small decorative lamp to reduce screen-to-wall contrast
- Color temperature: 3000K–4000K for focus; lower to 2700K in the evening to reduce blue-light exposure
- Renter swap: A plug-in desk lamp and a smart bulb in the ceiling fixture for scene control
For small apartments, see small living room decorating ideas that pair well with these lighting configurations.
Step-by-step planning checklist for any room
Use this sequence to design, shop, and brief an electrician or designer. The Lumen Method gives you a quantitative baseline: multiply the room’s square footage by the lumens-per-square-foot target for each layer, then distribute that total across multiple fixtures rather than one source.
Step 1 — Measure and map. Record the room’s square footage, ceiling height, window positions, and existing outlet and switch locations. Sketch a rough floor plan.
Step 2 — Assign layers. Decide which of the three layers each zone needs. A reading corner needs ambient + task. A display shelf needs accent only.
Step 3 — Calculate lumen targets. Use the table below as your starting point.
| Room / Zone | Ambient Target | Task Target | Notes |
|---|---|---|---|
| Living room (150–200 sq ft) | 3,000–4,000 lm | 800–1,100 lm per lamp | Dimmable ambient strongly recommended |
| Kitchen (150 sq ft) | 5,000–8,000 lm | 800 lm under-cabinet | Higher Kelvin (4000K) acceptable for task |
| Bedroom (120–150 sq ft) | 2,000–3,000 lm | 400–800 lm per bedside | 2700K throughout |
| Bathroom | 1,500–2,500 lm | 1,500–2,000 lm at vanity | CRI 90+ at mirror |
| Dining room | 2,000–3,000 lm | Pendant covers task | Pendant 30–36 in. above table |
| Home office | 2,000–3,000 lm | 400–800 lm desk lamp | 3000K–4000K for daytime work |
Step 4 — Select fixtures and confirm dimmer compatibility. Check that LED bulbs are labeled “dimmable” and that the dimmer is rated for LED loads (trailing-edge dimmers work best with most LED drivers).
Step 5 — Plan circuits and controls. Identify which fixtures need separate switches or dimmers. Independent dimmers for each layer let you shift the room’s atmosphere quickly without touching fixtures.
Step 6 — Call a licensed electrician when you need: new circuits, hardwired sconces or recessed cans, 3-way switch wiring, or dimmer replacements in older panels. Provide the electrician with a placement diagram, fixture model numbers, dimmer model numbers, and a note on LED compatibility.
Step 7 — Test scenes. Once installed, test at night and in daylight. Adjust dimmer levels for a “bright task” scene and a “relaxed ambient” scene. Note any glare on screens or mirrors and reposition before finalizing.
How to choose the right bulbs: lumens, Kelvin, CRI, and beam angle
Watts measure energy use, not brightness. Lumens measure actual light output. A standard 60W incandescent produces about 800 lumens; a 75W produces about 1,100 lumens; a 100W produces about 1,600 lumens. Buy by lumens, not watts.
Color temperature (Kelvin):
- 2700K–3000K for most living spaces — bedrooms, living rooms, dining rooms, and entries. Warm, relaxed, flattering.
- 3000K–3500K for kitchens and bathrooms where you want warmth but slightly better color clarity.
- 4000K for under-cabinet task strips or home office task lamps where detail accuracy matters.
- Keep all bulbs in one room within 200K of each other to avoid a mismatched look.
CRI (Color Rendering Index):
- CRI 80+ is acceptable for general living areas.
- CRI 90+ near artwork, makeup mirrors, or anywhere color accuracy is important.
- CRI 95+ for gallery-quality display lighting.
Beam angle:
- Wide flood (60°+): ambient and general fill.
- Narrow flood (25°–45°): task lighting, under-cabinet strips.
- Spot (10°–25°): accent lights aimed at art or objects.
- LED strips: look for a beam angle of 120° for even wall washing; tighter angles for shelf lighting.
Common conversions:
For table lamp selections, an 800-lumen dimmable LED bulb at 2700K covers most task and ambient needs in a residential setting.
Controls and installation: dimmers, smart options, and zoning
Dimmer types and LED compatibility
Two main dimmer types exist for residential use. Leading-edge (TRIAC) dimmers are the older standard, originally designed for incandescent bulbs. Many work with LED bulbs, but compatibility varies by brand. Trailing-edge (ELV) dimmers are the modern standard for LED loads: they produce less flicker, less buzz, and a smoother dim curve. When buying a dimmer for LED fixtures, check the manufacturer’s compatibility list — not all LED drivers respond the same way.
A practical checklist before buying:
- Confirm the bulb is labeled “dimmable.”
- Match the dimmer’s minimum load rating to your LED wattage (many LED dimmers have a 25W minimum; running a single 8W bulb can cause flicker).
- Use a trailing-edge dimmer for most LED retrofit projects.
- For multi-bulb circuits, stay within the dimmer’s maximum wattage rating.
Smart bulbs vs. smart switches
Smart bulbs (Philips Hue, LIFX, and similar) screw into any existing socket and connect via Wi-Fi or Zigbee. They are the fastest renter-friendly upgrade: no wiring, no electrician, full scene and schedule control from an app. The trade-off is that the wall switch must stay on — turning it off cuts power and removes smart functionality.
Smart switches replace the wall switch and work with any compatible bulb. They are better for homeowners who want whole-circuit control and prefer standard bulbs. They require a neutral wire in most cases, so confirm your wiring before ordering.
Zoning and scene programming
Large or multi-use rooms benefit from separate circuits or at least separate switched outlets for each layer. A living room with ambient cans on one dimmer, floor lamps on smart plugs, and accent strips on a third control gives you three independent levers. Centralized controls and dimmers let you create scenes — preset combinations of brightness levels — so switching from “movie night” to “reading” takes one tap.
For renters, smart plugs (TP-Link Kasa, Amazon Smart Plug, and similar) on floor lamps and table lamps replicate zoning without any hardwiring.
When to call an electrician
- Installing hardwired recessed cans or sconces
- Adding a new circuit for a dedicated lighting zone
- Replacing a switch with a dimmer when no neutral wire is present
- Any work inside the electrical panel
Common mistakes and how to fix them
- Single overhead reliance. One ceiling fixture on full blast makes a room feel institutional. Fix: add a floor lamp and a table lamp, then dim the overhead to 40–60%.
- Color temperature mismatch. A 2700K lamp next to a 5000K recessed can looks wrong immediately. Fix: replace all bulbs in the room with the same Kelvin value.
- Glare on TV screens. Bright overhead fixtures positioned in front of or above the TV reflect directly on the screen. Use soft side lamps and a subtle backlight strip behind the TV, and test from the seating position at night before finalizing placement.
- No dimmers. Without independent dimming, you cannot achieve the right mood for different times of day. Putting every fixture on a dimmer is the single most impactful control upgrade — even a $15 inline cord dimmer on a floor lamp makes a measurable difference.
- Accent lights competing with ambient. When accent and ambient are the same brightness, the focal point disappears. Fix: dim the ambient layer or increase the accent beam intensity so accent reads at roughly 3× ambient.
- Too many focal points. Highlighting every shelf, plant, and artwork creates visual noise. Limit accent lighting to two or three features per room.
- Wrong beam angle for accent. A wide-flood bulb in a track head washes the wall instead of spotlighting the art. Swap to a 25° or narrower spot bulb.
- Vanity lighting from above. An overhead bathroom fixture casts shadows under the eyes and chin. Fix: add side-mounted sconces at eye level (approximately 60 inches from the floor).
Pro Tip: Before committing to a full fixture purchase, swap one bulb and add one plug-in lamp. If the room feels noticeably better, the larger investment is worth it. If it does not, adjust placement or Kelvin before spending more.
Thinking like a designer when you layer lighting
The most common mistake homeowners make is treating lighting as an afterthought — something to sort out after the furniture arrives. Designers plan lighting before the first piece of furniture is ordered, because the fixture positions determine where furniture can go, not the other way around.
When making trade-offs, prioritize comfort and control over fixture count. A room with three well-placed, independently dimmable sources outperforms a room with ten fixtures on a single switch. The control is what makes layering useful.
On finishes and sightlines: mixing metal finishes (brushed brass and matte black, for example) works when the shapes repeat across the room. A brass floor lamp and a brass picture light on the opposite wall create a visual rhythm that reads as intentional. Repeating a fixture type across a sightline — two matching sconces flanking a fireplace, two identical pendants over an island — signals design confidence without requiring a large budget.
Test everything at night. Daylight masks problems that become obvious after dark: a lamp that looked fine in the showroom may cast a harsh shadow on the wall, or a recessed can may create a hot spot on a glossy surface. Walk the room at night, sit in every seating position, and check every reflective surface before finalizing placement.
Noble Abode decor that pairs with your lighting plan
A well-executed lighting plan needs the right objects to illuminate. Noble Abode’s mood lighting collection includes table lamps and rechargeable downlight options that slot directly into a layered plan — no hardwiring, no contractor, no waiting.

For accent lighting, the pieces that respond best to a directional spot or a warm LED strip are sculptural: the David Art Sculpture, the Abstract Art Figure for home office displays, and the Nordic Modern Minimalist Living Room Décor all catch light in ways that flat decorative prints do not. A small mirror or a Luxury Ruffled Electroplated Ceramic Vase placed within an accent beam multiplies the light and adds depth to a shelf or console. For renters, Noble Abode’s rechargeable table lamp is a plug-free task and ambient solution that moves with you. Browse the full selection at Nobleabode and find the pieces that complete your lighting plan.
Sources
- Layering Lighting - How To Layer Your Home’s Lighting | Lumens
- Layered Lighting Tips | Lutron
- What Is Layered Lighting In A Living Room? Definition, Examples & Tips | Nordic Design Blog
- How We Get That Moody, Layered Glow: A Room-by-Room Lighting Guide - Chris Loves Julia
- Fix Layered Lighting Design | The New York Times
- How To Create A Lighting Plan For A Living Room With A TV: Step-By-Step Guide | Nordic Design Blog
FAQ
What is layered lighting?
Layered lighting is a design approach that combines ambient (general), task (focused), and accent (decorative) light sources in one room so each serves a distinct purpose. The goal is flexible, comfortable illumination that can shift between activities by adjusting independent controls.
How do you layer lighting in a room?
Start with an ambient source (a ceiling fixture or recessed cans), add a task lamp at the activity zone, and place an accent light on a focal point such as art or shelving. Put each source on its own dimmer or smart plug so you can adjust them independently.
Why does overhead lighting alone make a room feel cold?
A single overhead fixture creates flat, even light with no shadows or depth, which reads as institutional rather than residential. Adding lower-level lamps and accent sources creates the contrast and warmth that make a room feel inviting.
What are the five layers of lighting?
Definitions vary, but a common version used by lighting designers lists ambient, task, accent, decorative, and perimeter (or architectural) as the five layers. The first three are the practical foundation for most residential rooms; decorative and perimeter layers add refinement and visual spaciousness.
Can renters use layered lighting without hardwiring?
Yes. Plug-in floor lamps, rechargeable table lamps, plug-in sconces with cord covers, adhesive LED strips, and smart plugs cover all three core layers without any electrical work. Smart bulbs in existing sockets add scene control and dimming with no wiring required.